Saturday, November 10, 2012

BANNERS FOR SPECIAL NEEDS KIDS

Christmas Banners for Special Needs Kids BLOG HOP, November 10-12, 2012


"In the eyes of children, we find the joy of Christmas. In their hearts, we find its meaning."

As joyous as Christmas is for most families, for some, their holidays are filled with worry, medical treatments and tests, and pain -- for their child must be hospitalized or she or he needs long-term care rather than being home with their families.

For these kids, Santa doesn't slip down a chimney but rather, often comes in the guise of community volunteers who help make the season bright.

This is the second Christmas season that our own band of dedicated and loving paper crafters have come together to make Holiday banners for children who are too sick to be home for the holidays. Welcome to the Christmas Banners for Special Needs Kids blog hop!

I am especially pleased that this year, not only have our numbers of generous crafters swelled so our Hop is over three full days, but also, that we have partnered with another great cause and recipient of our banners!

By teaming up with Madison Womack's I FEEL THE LOVE PROJECT, the banners our crafters have handmade will be going to the hospitalized children at Children's Hospital Central California!
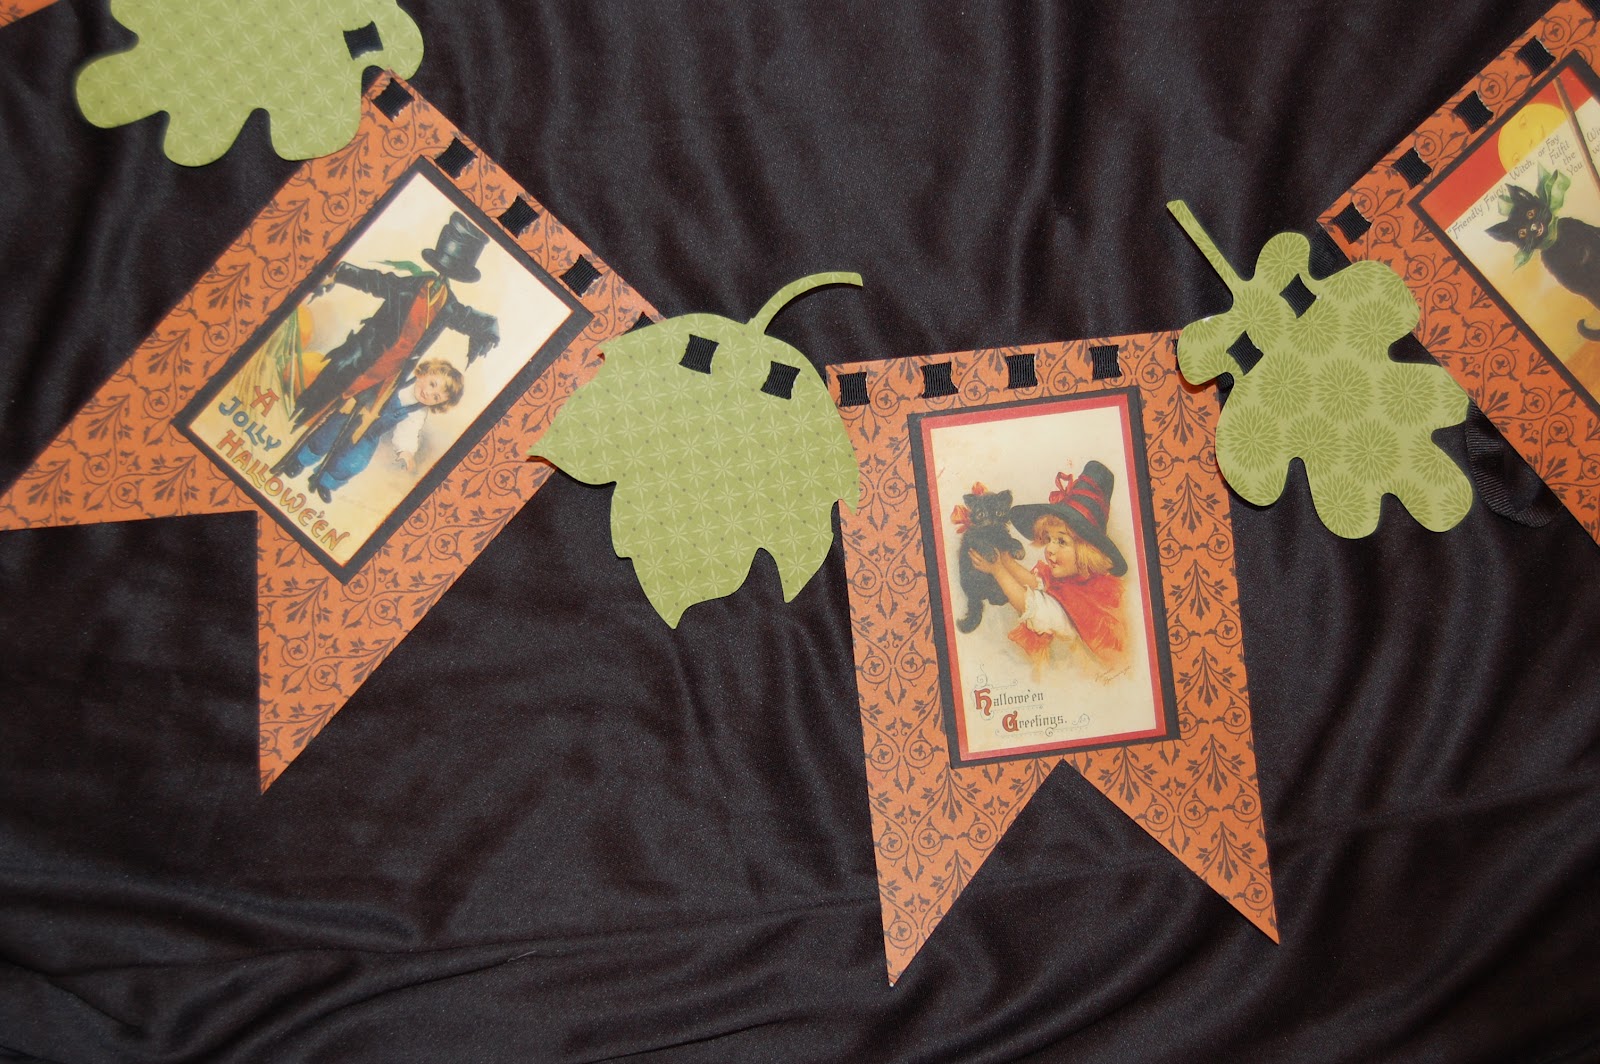
First, let me show you the banner I made for today's post:


I used:
Santa Sleigh - Cricut CHRISTMAS cart
Letters - Cricut LIMEADE cart
Red Sizzix die "Pine Tree"
Yellow Sizzix tree die
Sew Ribbon Scallop Tool by We R Memory Keepers
Organdy 7/8" ribbon - Willow - color
Paper:  Simple Stories "25 Days of Christmas"
Sizzlits die:  Cityscape
Fiskers Tool to ripple paper

Now, have I inspired you to make and donate your own banner or a Christmas card or two to the I Feel the Love Project? I hope so! Because if you will, you'll be entered into a drawing to win Ellen CARDMONKEY's SPIRIT OF CHRISTMAS Super-Fantastic Gift Basket!
Throughout the month of December,  CARDMONKEY will be adding crafty goodness to this basket so that it will be over-flowing and ripe and ready for under your tree. CARDMONKEY will be picking the winner on Christmas Eve, announcing the winner on Christmas Day, and if you win, you'll have the basket in your hands by New Year's Day!!

Stay tuned to the CardMonkey blog over the next few weeks leading up to the drawing, as CARDMONKEY will be posting the contents of the basket as they mount.

OK, so to win the GRAND PRIZE (all continents are welcome!), here's what you must do:

1. Be a follower of the CardMonkey blog and tell her in your comment howshe can contact you.

2. Leave a comment telling Ellen what you plan to make and send to the IFTL project by their deadline, December 10. Then do it! Go to www.ifeeltheloveproject.blogspot.com for mailing information for your card or banner. Your card or banner MUST be received by Madison by the deadline to be eligible to win the GRAND prize!

NOT READY FOR PRIME TIME?? You can still win great blog candy just by being here and commenting on as many banner makers' blogs over the course of the next three days.

Since we have more than 50 banner makers today, tomorrow and Monday, Ellen will be picking 5 blogs at random, and then one random comment from that Blog site, for that commenter to win one of five great prizes, which are:


1. Susan Bermudez, Independent Consultant for Creative Memories, donating a $20 gift certificate for Creative Memories products from her catalog (http://www.mycmsite.com/sites/susanbermudez/).

2. Scrappin' Madge: $25 Gift Certificate to The Scrappin Lounge Shoppe (http://madgesscrappinlounge.storenvy.com/)

3. Fresh Brewed Designs: Two prizes - One prize is a rubber stamp, Item #497 "Cutie Pie Ice Skating" (http://www.freshbreweddesigns.com/item_497/Cutie-Pie-Ice-Skating.htm), and the other is a $15 Digital Stamp gift card.

4. The Paper Temptress (www.papertemptress.com) - Owner Patricia Dunbar will donate a $25 Gift Certificate to her online store, the Paper Temptress.

5. The Pinque Peacock (www.pinquepeacock.com) - Owners Jessica Shelton will donate a gift certificate to her NEW store (products are being added daily -- watch as she grows!)

6. In addition, Close to My Heart Independent Consultant Lucy Kelleher will award a $20 gift certificate to a randomly-selected hopper who visits her blog (http://love2createitall.com) and/or Facebook page (https://www.facebook.com/LucyK.CTMH) and posts a comment about the banner blog hop!

P.S. -- Be sure to check out as many blogs as you can, as several will be providing their own blog candy with their own requirements. If I catch them along the way, I'll add them to this list, as a shout out of gratitude, and also so you don't miss out on some sweet candy(canes!)...

Here is the Hop line up for Sunday, November 11:

1. Ellen ♥ CardMonkey - http://cardmonkey-business.blogspot.com

2. For Sunday, November 11:
1. Ellen CardMonkey - http://cardmonkey-business.blogspot.com/


6. Lissa Marie - http://somanycrafts.com/ ……NEXT


9. Scrappin Madge - http://thescrappinlounge.com/


YOUR NEXT STOP is: Lissa Marie - http://somanycrafts.com/

Thank you again for visiting us here for a beautiful and worthwhile endeavor. God bless all the little children wherever they spend their holidays!!

For Saturday, November 10:
  1. Ellen ♥ CardMonkey - http://cardmonkey-business.blogspot.com
  2. Jessica - http://jessicascraftshaque.blogspot.com/
  3. Lezlye - http://lezlyes.blogspot.com/
  4. Edwina - http://edwinascreations.blogspot.com/
  5. Shawnee - http://quiverofangels.blogspot.com/
  6. Scrappin Madge - http://thescrappinlounge.com/
  7. Jessica E.~ http://chick-n-scrap.blogspot.com
  8. Kimi ~ http://lovebugcreations3.blogspot.com
  9. Janet ~ http://www.ladyluvbug.blogspot.com/
  10. Theresa Neubaum ~ http://www.scrappyartcrafters.blogspot.com/
  11. Khrista - http://creativeandcraftyteacher.blogspot.com/
  12. An'Jenic - http://anjenicgibson.blogspot.com/
  13. Jennifer R - http://craftycardgallery.blogspot.com/
  14. Gloria W. http://gloriawest.blogspot.com/
For Monday, November 12:
  1. Ellen ~ CardMonkey - http://cardmonkeyspaperjungle.com/
  2. Marianne - http://paperorfabric.blogspot.com/
  3. Beckie ~ http://justbcreativecrazy.blogspot.com/
  4. Tami - http://tamboscreations.blogspot.com/
  5. Heather D. - http://joemamainks.blogspot.com/
  6. Jearise - http://lorbysworld.blogspot.com/
  7. Susan B - http://susanascorner.blogspot.com/
  8. Jamie M. http://craftygirl21.blogspot.com/
  9. Linda Simpson - http://lindasimpsoncraftypieceofheaven.blogspot.com/
  10. Theresa ~ www.thescrapbookingqueen.com_
  11. Vicky - http://www.luvmygypsy.blogspot.com/
  12. Debbie T- http://debbiescrafttime.blogspot.co.uk/
  13. Pam Funk - http://dreamersklub.blogspot.com/
  14. Shelly - http://kccroppers.blogspot.com/
  15. Alina - http://neverstopscrapping.blogspot.com/
  16. Lisa L. - http://lisascreativeniche.blogspot.com/
  17. Nancie - http://alittlepieceofmebynancie.blogspot.com/
  18. Dorcas - http://craftycardangel.com/
  19. Debbie _http://craftydeb-ddscrafts.blogspot.com/
  20. Rexann - http://ibecircled.blogspot.com


Saturday, September 1, 2012

Halloween Spooktacular Banner Hop for Special Needs Children

o


Welcome to the annual Halloween Spooktacular Banner Hop for Special Needs Children!
I am delighted to join with more than 3 dozen other women who have each made at least one Halloween-themed banner that will be donated to hang in the room of a medically-fragile child at Pediatric Specialty Care in Pennsylvania.
Our Hop Hostess (Ellen CardMonkey Jarvis) works at PSC’s Bucks County site as Admissions Coordinator. The Banner Hop starts there, so please be sure to circle back to the beginning to see all of the terrific banners have been made for these very special children.

Ellen shared this information with us about Pediatric Specialty Care: “PSC is a very special place where children stay either long- or short-term, typically after hospitalization.  Most are dependent on ventilators and other technology to survive. Some have been born too early or with genetic diseases or birth injuries.  Other children suffer injuries later in life that require constant care later, including brain injuries from trauma or loss of oxygen (from choking, suffocation or drowning) and spinal cord injuries.


These children and their families -- and PSC’s staff -- will be thrilled to receive the Halloween banners, to help brighten the season when their friends and siblings will be out trick-or-treating.”

Here is a complete list of Blogs in case you get lost along the way:
  1. Ellen ♥ CardMonkey - http://cardmonkey-business.blogspot.com/
  2. Sandie Dunne - http://sandieshores.blogspot.ie/search/label/banner%20hop
  3. Ashley - http://theglamoroussideofscrapping.blogspot.com/
  4. Lucy ~ http://love2createitall.blogspot.com/
  5. Dena ~ http://missdjones.blogspot.com/
  6. Yvette ~ http://gammascreativecorner.blogspot.com/
  7. Jamie ~ http://craftygirl21.blogspot.com/
  8. Nancie ~ http://alittlepieceofmebynancie.blogspot.com/
  9. Beth ~ http://motherandaughterdesigns.blogspot.com/
  10. Erica ~ http://mycricutcraftroom.blogspot.com/
  11. Jearise ~ http://lorbyworld.blogspot.com
  12. Jenny - http://crazyaboutcricut.blogspot.com/
  13. Lisa T.- http://bitbythecricutbug.blogspot.com
  14. Robin ~ http://scrapandchat.blogspot.com/
  15. Jessica S ~ http://jessicascraftshaque.blogspot.com
  16. Lori A ~ http://scrappinmystressaway.blogspot.com/
  17. Jenny D. ~ http://www.yogimemories.blogspot.com/ ***HERE
  18. Linda Simpson - http://lindasimpsoncraftypieceofheaven.blogspot.com ***NEXT
  19. Beckie ~ http://justbcreativecrazy.blogspot.com
  20. Scrappin Madge: http://www.thescrappinlounge.com
  21. Jennifer R ~ http://craftycardgallery.blogspot.com
  22. Debbie T ~ http://debbiescrafttime.blogspot.co.uk/
  23. Tami McD ~ http://tamboscreations.blgspot.com
  24.  Susan ~ http://susanascorner.blogspot.com/


Here is the banner I am sending to a child at PSC:
 I found this vintage looking paper and thought it was perfect - still Halloweenish but not scary!  I found it at my Local Scrapbook and Craft Store Mangelsens.

I used Art Philosophy for my banner flags and my Sizzix die for my leaves.


This Hop is two days (Saturday, September 1 and Sunday, September 2), and on each day you will see different banners. Be sure to visit on both days to see the truly inspirational work of these generous bloggers, and leave some love (comments) on as many sites as you can – because if you do, you can up your chances to win some Spooktacular blog candy, including from these sponsors:
Madge's Scrappin' Lounge is donating a $25 gift certificate to her store at http://madgesscrappinlounge.storenvy.com/!
Lisa Peters - $15 shopping spree to her adorable paper piecing store at Scrapping With Lisa Designs at www.scrappingwithlisadesigns.com

Lucy Kelleher - Independent Consultant for Close to My Heart is donating a $10 Gift Certificate which you can use towards any Close to My Heart products! ( http://lucyk.ctmh.com/). To enter to win, you will need to leave a comment on her blog (http://love2createitall.com/) and become a follower of her blog. For an additional entry, "Like" her Facebook page at: https://www.facebook.com/LucyK.CTMH.
Debi Weidleman - Independent Consultant for Stampin' Up is also donating a $10 Gift Certificate which you can use towards any Stampin' Up products - http://www.stampinup.net/esuite/home/debiweid/.
Erica's Craft Room is donating two Cricut cartridges (!!!) -- Pretty Pennants and Mini Books.  Please visit and say thank you to Erica at http://www.shop.ericascraftroom.com/.


To qualify, all you have to do is leave at least one comment on our Hostess’s site (www.cardmonkeyspaperjungle) to name which banner spoke to you – ghostly or not!  What made it appealing to you?  Leave additional comments on as many banner makers’ sites as you’d like for extra chances to win!  Prize winners will be announced on Monday, September 3 on the CardMonkey site, where there will be a round-up of all of the Spooktacular banners for 2012.

Thank you for stopping by today!! Your next banner is created by LINDA S!

Monday, July 23, 2012

Wedding Cards

Here is a wedding card I made for a good friend using Stampin' Up stamps, embossing with Petals A Plenty embossing folder from Stampin' Up and some ribbon.

I made several of these for my daughter to use as Wedding Thank Yous.  I used a scalloped heart punch from Fiskars, a scalloped oval punch from Stampin' Up with a plain oval punch from SU, and an embossing folder from SU.

Wednesday, June 13, 2012

Silhouette Cameo IS IN THE HOUSE! LOL

My new Silhouette CAMEO arrived yesterday 6-11-12!  I want you to know I spent this afternoon going page by page trying each feature on the CAMEO listed in the User's Manual.   Now if I can only "remember" what I read and tried out!  I've been known to have "Junior Alzheimer's".  LOL

Downloaded the Cameo User's Manual.  I wanted to surprise my husband and wound up surprising MYSELF!  I installed the software and hooked up to my computer "all by my little self"!  LOL  I'm not kidding about surprising myself!  Usually I defer all installation of any electronic toys to my wonderful hubby!  I'll admit I needed itty bitty help  from my better half.  My CD drive wasn't working on my computer.  My husband instructed me over the phone on installing the portable CD drive.  This enabled me to install the CAMEO software on my computer.   Thanks Honey!!!

This instruction book came with the CAMEO, the software and an instructional CD.  You will be happy to know that I READ the instruction book,WATCHED the instructional CD and tried my FIRST Cameo cut.  Normally I don't like reading instructions.  It's amazing how much help instructions provide!!!  I'll have to read them more often!!! LOL

TA DA!!!!!  My very first cut with my CAMEO.  This was made with the font on my computer!  Look mom, NO CARTRIDGES!!!  I know what you're thinking..."BIG DEAL".  It was a big deal to me.  I was totally fearful that I wouldn't be capable of installing the software myself!  It did take several attempts to get the right blade setting to cut this VERY thick card stock.  (Thank you Lori for my beautiful LIME GREEN card stock!)  The stubborn side of me wasn't going to give up without getting the card stock to cut on the CAMEO.

This is still part of my first cut.  I made these shapes from the software that was included ! 

Here is the "weeded" words and shapes.

I just had to add this picture.  I put the CAMEO mat on my black computer chair!  The electric green really pops against the black background!   It's ELECTRIC....reminds me of the Electric Slide song!  He he!  I know, I have issues!

I'm totally thrilled with the capabilities of this machine!  I'm so excited to watch YouTube video's to learn more on the CAMEO!  I'd love to read any tips, tricks, blogs or websites that you have found with CAMEO information!   

Tuesday, June 12, 2012

Mod Podge Bicycle Helmet

Check out this Recycled bicycle helmet!  I purchased this helmet for 75 cents at a garage sale this past weekend.  I found this fabulous project on page 31 in "MOD PODGE ROCKS!"  I just had to try it!

Top view of the helmet.  My 8 yr. old granddaughter Genevieve picked out the fabric at Hobby Lobby.  I purchased 1 yard of fabric.  WAY TOO MUCH fabric!  Probably 1/3 or less yard of fabric would suffice! LOL

"MOD PODGE ROCKS" by Amy Anderson was my inspiration!  I first saw this book at Manglesen's a local Omaha, NE craft store.  I had $20 in Manglesen's free money!  So this book was totally FREE! For those of you who don't live in Omaha....I have found this book at Hobby Lobby!

The fabric was prepared according to directions on page 12.  Apply a thin layer of Mod Podge onto the fabric using a foam brush.  Allow to dry.  This will enable you to cut the fabric like paper without worrying about frayed edges.  Cut rectangles of various sizes from the fabric, cutting enough to cover the helmet.  It requires you to use "Outdoor Mod Podge", however, I didn't have any "Outdoor Mod Podge" on hand so I used the "Matte Mod Podge".  I will update you at a later date if Matte Mod Podge can stand up to outdoor wear and tear!

I'm pleased with the final product!  I hope you are inspired to recycle!  If you're in Hobby Lobby, flip through the inspiring Mod Podge Rocks! book.  I plan to re-cycle an old suit case that I found at a previous garage sale using Mod Podge!  I'm so excited!!!

Monday, June 11, 2012

Princess Genevieve Wall Decor

I purchased the crown, paper and bling at Hobby Lobby.  Of course I used the 40% coupon!

I purchased the letter "G", paper and bling at Hobby Lobby.

My 8 yr. old granddaughter loves crafts!  She picked out the pink & black Zebra striped paper at Hobby Lobby.  Genenvieve brushed Mod Podge on the letter "G".  Next we put the paper on the letter "G".  

Genevieve rolled the brayer over the crown to remove any bubbles on the paper.  After the first layer dried a second coat of Mod Podge was added and allowed to dry.

Large bling was added after the final coat of Mod Podge dried.

Large bling was added after the final coat of Mod Podge dried.  It was so fun to see my granddaughter enjoy crafts like her grandmother!  Love you Vievers!

Tuesday, June 5, 2012

Father's Day cards

Fathers Day Tool box for the most wonderful husband of all...MINE!  My talented husband can fix anything!  I think growing up on a farm was a wonderful place to acquire new skills!  He's not afraid to try to fix anything!  I LOVE HIM TO INFINITY & BEYOND!  I can't remember where I saw this card.  I had to add guess at the dimensions.  I used the STAMPIN UP large background stamp "Woodgrain".  I used silver embossing powder on the metal tool parts.  I used green, red and brown embossing powder on the rest of the tool parts.  Sentiment was from STAMPIN UP "TEENY TINY WISHES" stamp set.  Silver brads were put on the four corners to add realism to the toolbox. 

I used retired STAMPIN UP stamps from 1996.  Don't have the correct names as I purchased these at a garage sale!

A wonderful Fishing Vest card that was seen on Splitcoaststampers.com under the Stampin Up site.  http://www.splitcoaststampers.com/gallery/showgallery.php?si=fishing+vest&cat=&x=0&y=0

I used the STAMPIN UP paper piercing tool to make the holes on the vest.  I used a brown marker to draw a line from the holes that pierced the paper to look like they were sewn on the card.  Buttons were added to give a 3-dimensional look to the card. STAMPIN UP stamps used on the Fishing Vest from 2002 FLY FISHING stamp set.

HAPPY FATHER'S Day!

Hope you Enjoyed!

Monday, June 4, 2012

Bottle Cap Magnets

Made the Bride & Groom some magnets for their new digs!  Are you wondering why did I photograph the bottle caps so far apart?  The magnets attached to each other if the bottle caps were any closer!  LOL

I used Epiphany Crafts Bubble Caps (clear bottle top with sticky adhesive on back), E-6000 glue,  3/4" round Magnets, Xyron adhesive on the back of phone picture, Creative Memories 1" circle punch and metal bottle caps that were black on the outside and silver on the inside.

Use E-6000 glue to adhere the magnet to the back of the bottle cap.  Punched out picture of bride and groom using Creative Memories 1" circle punch.   Run the photo through the Xyron to have adhesive to the back of the picture.  Place the picture on the inside of the bottle cap.  Place one clear Epiphany BUBBLE CAP over the photo.  Allow glue to dry 24-72 hrs.  Use glue in well ventilated room.

I'm so excited for Katie & Mike to get married, can you tell?????

Sunday, June 3, 2012

Wedding Canvas Collage

Wedding gift for my nephew Mike's 7-14-12 wedding to Katie.  I scrap lifted the idea from Manglesen's craft store in Omaha, NE.  The Manglesen's sample used pictures of the bride and groom from their wedding day. 


12"x24" CREATIVE ART TREE 13 oz. Cotton Duck Artist Canvas.  Thin 5/8" Stretcher Bars, Vinyl words purchased from Manglesen's craft store in Omaha, NE.  PAINT ALL CANVAS AREAS with a paint color of your choice.  I used WARM WHITE Acrylic paint by Americana .  Allow to dry completely before adhering photo's to canvas using Modge Podge.  Place vinyl saying to the right of the canvas area 1" away from the edge. 

  Picture of bride & groom taken from the SAVE THE DATE card.  Take photo copy of picture on regular photo copy paper.  I took my SD card to Kinko's to reprint copies on copy paper.  It cost 59 cents a picture gave a much more vibrant color than my home printer.  Mod Podge (matte finish) the picture to the 4"x4" artist canvas.  Gently rub the picture to the artist canvas.  Be sure to make edges stick down on the artist canvas using Modge Podge.   Allow to dry and ad a coat of MODGE PODGE to the top of picture.  Use E-6000 clear glue to adhere the 4"x4" canvas to the 12"x24" canvas.


I cut the letter "D" from TIE THE KNOT Cricut Cartridge. Place vinyl initial on one 4"x4" canvas. Adhere your favorite embellishment.  The flower and leaves were from Prima Flowers.  The silver metal heart with the word "Love" was on the candy that was handed out at the bridal shower on May 19, 2012.   See close up in next picture.


Can't wait to give this to my God Son Mike for his wedding to Katie on 7-14-12!!!  Hope you enjoy!